Mr. Miyagi's Upgrades

 09-21-2013, 10:15 PM
#1
V8 Miata Zealot
Thread Starter

I have a few upgrades to perform on "Mr. Miyagi" in the upcoming weeks that include mechanical oil pressure gauge, volt meter, & coolant temp. gauge install, retro-fitting a Homelink garage door opener into the console, installing a brake bias adjuster, new shift boot & e-brake boot, new collector gaskets, replacing leaking rear c/v boots, new hood release cable, new leather door panels, transmission crossmember support, installation of a 1995 ECU, & maybe a water/meth kit and/or an air-to-air intercooler. STAY TUNED!!


 11-22-2013, 06:52 AM
#3
V8 Miata Zealot
Thread Starter
Not much progress done. The car has been parked in the back of the garage since March, & I have been working on & enjoying my Cobra, instead. With cold weather coming in, I guess I will winterize the Cobra & dig out Mr. Miyagi.
11-22-2013, 08:24 AM
#4
Jim Stainer

Seriously your winter car is a V8miata and your summer car a Cobra?
Just so you know why I hate you I need to tell you my winter beater is a 97 Cavalier with 240,000 miles on it with a bad clutch, 3 bald tires and a broken windshield. True to the creed of winter beater life in the north country the solution to the problems with the Cavalier is to order a camshaft for the Miata…
Just so you know why I hate you I need to tell you my winter beater is a 97 Cavalier with 240,000 miles on it with a bad clutch, 3 bald tires and a broken windshield. True to the creed of winter beater life in the north country the solution to the problems with the Cavalier is to order a camshaft for the Miata…
11-22-2013, 08:45 AM
#5
V8 Miata Zealot
Thread Starter
I really need to get started on our home addition that will include another 2 accessible garage spaces (maybe 3) to park some of my stuff. With a garage & driveway full of cars, trucks, motorcycles, tools & equipment, it makes it very aggravating to get to anything.
12-13-2013, 04:46 PM
#6
V8 Miata Zealot
Thread Starter
Well, it started right up after sitting for 9 months. I drove it about a mile, brought it home, put it on the lift, & lost interest. Just not as fun as my Cobra. Not even close.
01-04-2014, 08:31 AM
#7
V8 Miata Zealot
Thread Starter
Well I got a little motivated the last couple of weeks & did a few things to the car. I modified the power window switch area of the center console to accept a Home-Link garage door opener. Also installed new leather shift boot & e-brake boot. Radio was removed to install new radio surround that has mounting holes for 3 gauges above it. The supercharger will have to be removed from the engine to access the sender location for the water temp gauge. A Steeda EGR eliminator plate is going in place of the BBK unit. While the intake is off, it will be drilled & tapped to accept the nozzles from the methanol injection kit which i finally ordered after months of research.....just to be told it is on back order. Damn the luck! LOL!!
01-04-2014, 08:51 AM
#9
V8 Miata Participant

 02-07-2014, 07:58 AM
#10
V8 Miata Zealot
Thread Starter
I was able to replace the blown-out Percy's aluminum collector gasket today with a copper one from Jegs. We will see how that style holds up. While the exhaust was loose, I drilled a hole in the transmission cross member, up through the passenger side floorboard, & added a nut-plate & bolt. WOW. That really took all of the slop & bounce out of the drivetrain. Thanks to Jason (MRM331) for the tip. Next will be the replacement of the seeping outer c/v boots with a set of Audi boots.
02-07-2014, 10:27 AM
#11
V8 Miata Participant

I'm kind of surprised that this mod works well. The floorboard sheetmetal is really thin. I would think the best place for this support would be right at the edge of the tunnel where the floor meets the tunnel. The tunnel is a major structural member, much heavier sheetmetal, and has a handy flange that ties into the floor that looks to me to be the right spot for some support.
Just a thought, Mike
Just a thought, Mike
02-07-2014, 06:58 PM
#13
V8 Miata Zealot
Thread Starter
Mine, too. I made a 1/4" thick x 2" wide plate, 9" long with a nut plate welded to it. It is attached to the interior floorboard & runs the length of the seam. When I tightened the bolt from below, the cross member moved up to meet the floorboard. VERY SOLID.
02-08-2014, 06:12 PM
#14
Administrator

I'm kind of surprised that this mod works well. The floorboard sheetmetal is really thin. I would think the best place for this support would be right at the edge of the tunnel where the floor meets the tunnel. The tunnel is a major structural member, much heavier sheetmetal, and has a handy flange that ties into the floor that looks to me to be the right spot for some support.
Just a thought, Mike
Just a thought, Mike
-Jason
02-09-2014, 02:35 PM
#15
V8 Miata Fan

Join Date: Aug 2011
Location: canada
Posts: 27
Likes: 0
Received 0 Likes
on
0 Posts
I was able to replace the blown-out Percy's aluminum collector gasket today with a copper one from Jegs. We will see how that style holds up. While the exhaust was loose, I drilled a hole in the transmission cross member, up through the passenger side floorboard, & added a nut-plate & bolt. WOW. That really took all of the slop & bounce out of the drivetrain. Thanks to Jason (MRM331) for the tip. Next will be the replacement of the seeping outer c/v boots with a set of Audi boots.
02-09-2014, 03:33 PM
#16
V8 Miata Zealot
Thread Starter
03-12-2014, 07:18 AM
#17
V8 Miata Zealot
Thread Starter
Gauges installed in dash & custom mount for methanol controller is grafted into the passenger side dash crash pad. Supercharger is removed for nozzle installation.
03-19-2014, 09:27 AM
#19
V8 Miata Fanatic


We are all watching and waiting! I enjoy following along as you truly create a unique Monster. Best regards and get this thing on the road this spring.
03-20-2014, 06:40 AM
#21
V8 Miata Zealot
Thread Starter
 03-20-2014, 09:19 AM
#22
Jim Stainer
You can click on the insert image button that is the 2nd button from the right in the posting tool bar 
But there is much better way than that if you can manage it. Usually guys use an external site like photobucket and post the ING links into the thread. That way photos show up full size with out clicking on them and there is no limit to how many photos you can put in.
Forums are designed to import IMG codes seamlessly so when posting an exterinal photo look for the IMG label.
It's the bottom one here:
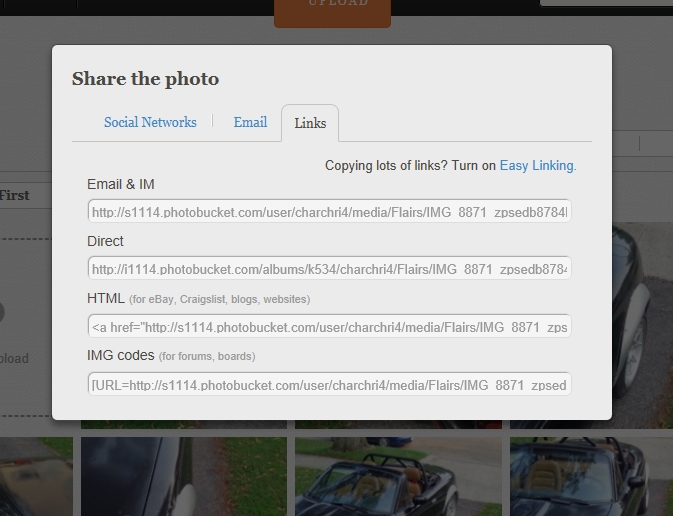
This is from photobucket and you can just click on that IMG text and it automatically loads it for you. Then just paste it into your post and you are good to go.
You just put that code where ever you want the photo in your post. So the text to make the photo above looks like this:
It's the bottom one here:
[UL=http://s1114.photobucket.com/user/charchri4/media/Flairs/ingcode_zpsfbe9fc45.jpg.html][IMG]http://i1114.photobucket.com/albums/k534/charchri4/Flairs/ingcode_zpsfbe9fc45.jpg[/IG][/URL]
This is from photobucket ...
But like I said you don't type any of that you just click on the box and it does it for you. The sweet thing about using an external photo site is you can use those photos for anything like PMs or craigslist other threads on other sites.
OK it's time for a good photo heavy Mr Miyaji thread!!
PS
You don't have to do this but for ease of loading it's nice to size your photos around 350k or so and they still show up really good that way. If you don't have a photo editor to crop and size this is a really good free one that I use all the time. IrfanView - Official Homepage - one of the most popular viewers worldwide
Last edited by charchri4; 04-22-2014 at 08:59 AM.


